
Let’s be honest—eyeliner can be tricky at ANY age. But as we mature, things shift a little. Especially around the eye area! Skin texture changes, lids may lose some firmness, and suddenly the same liner routine that worked in your 20s starts smudging, skipping, or dragging you down instead of lifting you up.

But despite this, there’s an upside. With the right tools, techniques, and a few pro tricks, eyeliner can still be one of your best beauty friends at any age. And no, I do not personally think that “just skipping” this step is an option. Even in the most simple form, using eyeliner is very impactful.
By the way, do you own a GOOD makeup mirror? Not the one on your bathroom wall that’s too far away. You need to be able to see WHAT you’re doing close up! My fave Sharper Image Hollywood Vanity Mirror is currently on sale for 49% off until 6/30/2025, so take advantage of this one ladies!

Are you ready for my best eyeliner tips for women 40 and up? I’m including step by step photos, along with top performing product suggestions to help you define, lift, and keep everything right where you want it.
1. Eye Lid: Prime It
You aren’t using an eyelid primer yet? You 100% should be! It’s going to give that eyeliner something to grab onto and stay put instead of applying on bare eyelid skin. Apply it over the entire eyelid down to the lash line, a thin layer is enough, rub in good with your finger or a concealer brush, $7.

Pro product used: Ulta Beauty matte veil longwear eyelid primer, $13. This one is top notch and evens out the coloring on the lid slightly as well.
2. Pick Your Liner Formula— Soft but Not Too Soft
Pencil liners are perfect for mature eyes if you pick the right one. Look for gel-based pencils that glide on easily without tugging delicate skin, but that set down to a smudge-proof finish. A great formula gives you enough time to blend, then stays put all day. Try shades like espresso, charcoal gray, or deep plum for a softer look than black, which can sometimes read too harsh, especially on very fair-skinned ladies.

Pro Product used: Stila Stay All Day Smudge + Set Waterproof Eye pencil, $23, in Damsel Dark Brown. This is one of THE best mid priced range eyeliners on the market right now that is easy to draw on but once it sets, it stays put! Great color options as well.
A really good drugstore option would be Maybelline Tattoo Studio gel eyeliner, $10. If you want a truly luxe liner experience, I’ll always suggest Victoria Beckham Satan Kajal liner, $34, they’re absolutely phenomenal.

For lower inner waterline, I used the Revolution Beauty streamline waterline eyeliner in “nude,” $6. It’s my new fave and works so very well for brightening the whites of the eyes.
3. Go ahead With Your Shadow
Do your eyeshadow look – whatever you usually do. One shade or two shades, accent the crease, go ahead with all of it before you do your liner.
I chose to add the matte pale white pink, “compassionate” from the tarte palette I’m using, underneath the brow to bring it forward. Then I mixed the two mid-tone browns “changemaker + resilient” and applied them along the crease, focusing on the outer corners. I also added the pale champagne shimmer, “kind hearted,” from the lash to crease to slightly brighten and open up the eye.
Pro Product: tartelette Amazonian Clay travel palette, $25. This 6 shade palette is seriously a great investment for those that want a beautiful eye without a lot of confusing colors to choose from. The pigments are buttery smooth (reminds me of Charlotte Tilbury palettes) and is a gorgeous combo of mattes and shimmer with shades that will flatter all eye colors from green, blue, hazel, to brown!
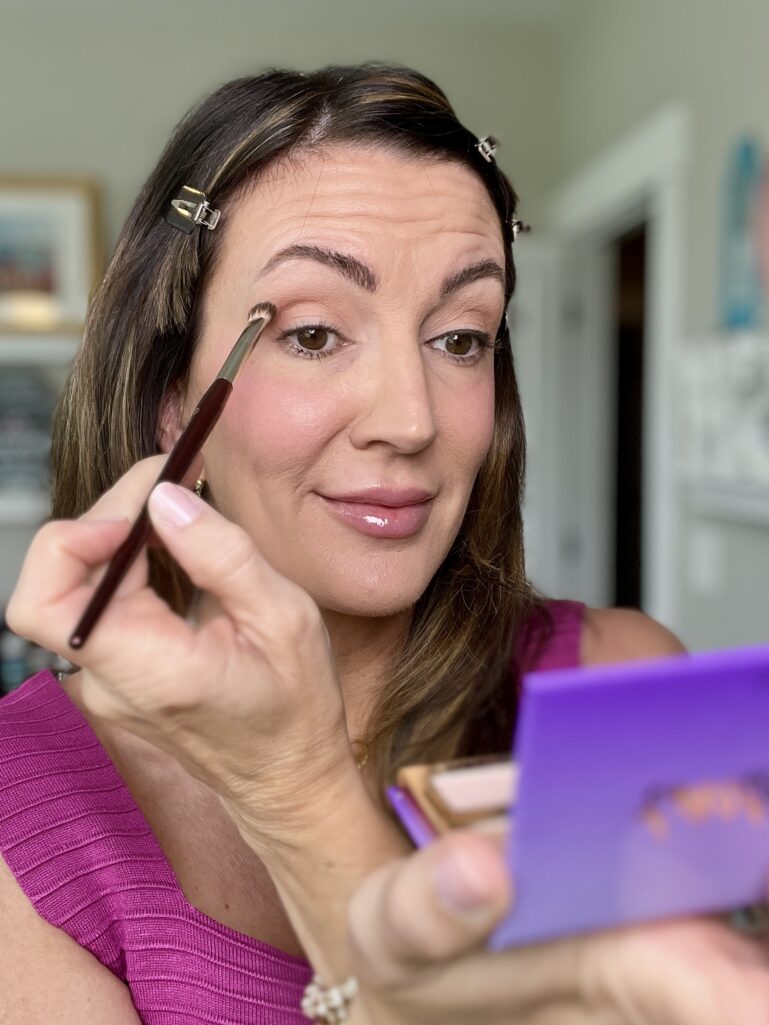
4. Eyeliner: Skip the Waterline, Tightline Instead
While the lower waterline might have been your go-to for drama years ago, it can now make eyes appear smaller or more tired if you apply too much dark, heavy liner in addition to your upper liner. Instead, try tightlining the upper lash line —it works for any and all ages!

It’s all about applying eyeliner right at the base of your upper lashes, and even filling in the space between the lashes. This gives your eyes definition without looking heavy, and it instantly makes lashes look thicker – and it’s really hard to mess this up!
You could just do this, then go on with the rest of your eye makeup and it would look good. But of course I’ll be suggesting to go a step further if you’re willing…
5. The Technique
A heavy cat eye isn’t the goal—but a subtle lift at the outer corner? Yes, please! Instead of trying to pull off a dramatic flick, smudge out your liner immediately with a liner brush along the upper lash line and gently angle it upward just at the outer third of your eye.


Use a small, angled brush to soften this wing. It creates a flattering, lifted effect without being obvious. And even though it’s a small flick, it makes a big impact in terms of lift. Remember: Always lift up and out, never drag your liner downward with your natural eye shape.
Pro Product: BK Beauty Pro Precision angled liner brush, $15, works for the tiniest of eye beds.
6. Eyeliner: The Magic Trick
Now this extra step makes that jagged eyeliner look super smooth without much skill!
Take the same small eyeliner brush and dip it into a matching eyeshadow that will go with whatever liner shade you’re using. For example, I’m using a black/brown eyeliner, so I chose to use the darkest shade in this tarte shadow palette, “adventurous.”

Then take the brush with powder, and go directly on top of the physical liner with small sweeping motions to blur out the edges and swoop out that wing to create a softer flick. It will make that liner look SO good!

7. Lashes: Curl + Coat
You know I’d NEVER do an eye makeup look without curling the lashes and then coating them with mascara! Never ever. Too many older women forgo the curling step, and it makes no sense to me. Take 30 seconds, buy a good metal curler, and do it!

Pro Products: Shiseido lash curler (iconic), $27, and Caliray Come Hell or High Water, $24, tubing mascara.
8. Less is More—But Strategic Is Best
Instead of ringing the whole eye in liner (which can make eyes look smaller), focus on the top lash line. If you want some definition underneath, keep it light and only go ¾ or halfway across, starting from the outer corner. Use a soft warm or cool brown shade of shadow with the liner brush, and smudge it slightly for a gentle shadow effect that defines without closing off the eye.

I also made this simple eye look a bit more “extra” by tapping on a bit of a new very fun shadow single from Half Magic, $13, in shade “Blushing Lizard.” I tapped it just into the center of my neutral shadow look to give it a mauve/taupe + blue reflected duochrome finish! Gosh this little accent made my lids so happy and come alive!
9. Lock it In
Finally, if you wear concealer, apply it AFTER all of this is done and you’ve cleaned up underneath the eye with a Q-tip. Apply your concealer NOT all the way to the lash line which is unnecessary because the cells under there will automatically draw the product up further anyway throughout the day.

And be sure to set concealer with a light amount of loose powder to soak up that creaminess which will block the eyeliner from transferring below. You can even spray your eyelid makeup with some setting spray (eyes closed of course) to further protect it!
Pro Products: Laura Mercier ultra blur loose powder,$48 + Revolution Makeup Superfix Misting Spray, $15, love the aerosol aspect of this!

The Rest of My Look Details
The rest of my look details: This Amazon ribbed square tank, $20, in shade fuschia. I do love the fitted aspect of this top, wearing a small . // My Sequin jewelry choker + charm combo is a staple in my jewelry box – y’all tired of seeing it yet?? // I’m wearing older Luv AJ gold earrings but they have a lot of cute options available. // Still wearing the trendy Free People barrel jeans, $98! // My super cute rainbow shaded sandals from Amazon that go with everything solid in my closet, $29 // My lip color is Nyx Fat Oil Slick click pen in “That’s Major,” $11.
Final Thoughts
Your eyes are still one of your best features—and eyeliner can beautifully enhance them with just a little finesse. These small tweaks can make a huge difference in how your makeup wears and how confident you feel.
I loved, loved getting all of your comments on my last post about my upcoming trip to St. Maarten and the makeup I’ll be bringing for my beach selfies! I haven’t been on an airplane in 4 years, so I couldn’t be more excited!! Also liked hearing where you ladies have plans to go for this summer.
Do you have a favorite eyeliner or tip that works wonders? Share it in the comments—I’d love to hear what’s in your makeup bag!